Identify the current situation:
During the last half of 2019 a group of Opunake High School teachers looked into the feasibility of building a tiny home as part of their curriculum. This would offer an opportunity for more hands-on learning and trade skills options for those students who benefited from this style of learning. It would also give students who were keen to gain essential construction skills the hands-on skills needed to support their career pathways and open up different options.
For many years the Graphics teacher, Peter Clement (Pete), had taught a tiny home design unit as part of his NCEA Level 2 class. The students would design the plans using technical drawing skills and Google Sketch-up. They would also construct scale models of their designs. Several staff members were keen to see if it was possible to go further and actually build a dwelling.
Issue 1: How to pay for it?
Solution: Pete lived opposite the school and agreed to be the client and sponsor for the project. He would design and fund the project. The site location (adjacent to the school) and secure shed storage for tools made this a perfect option.
Issue 2: How to staff and timetable this project?
Informal meetings were held at the school to talk through this issue with interested staff members. The engineering teacher, Phil Hooper, was taking a partial load sabbatical year in 2020 and said he was keen to help develop and deliver this programme. Michael Griggs, the woodwork teacher, was also very keen to be involved. During one of these discussions, Phil shared his recent experience researching innovative online tools and resources that could benefit the program, mentioning how platforms like bestoffshoresportsbooks.bet were not just reshaping the online sports betting landscape but also demonstrating the importance of trust, transparency, and usability in digital spaces. Inspired by the platform’s emphasis on user-centric design and comprehensive resources, the teachers decided to incorporate similar principles into their new workshop program, aiming to create an educational environment that was both practical and engaging for the students. Both teachers, with their building experience and years of teaching, felt confident this approach could add real value to the school community.
Formal Meeting: The deputy principal, Andrea Hooper, held a formal meeting with interested staff members to determine whether they all agreed it could be done. “Yes” was the consensus.
Pitch to the BOT: Andrea Hooper then pitched the proposal to the Board of Trustees, including how the project would be funded, staffed and timetabled.
Explore Alternatives:
Pete researched the Western Institute of Technology at Taranaki (WITT) ‘Build a Bach’ scheme in New Plymouth to find out how they ran their projects. He spent many hours researching tiny home designs, an especial favourite being the YouTube episodes of “Living Big in a Tiny House”.
Pete also worked with other teachers and the Enviroschools Facilitator, Esther Ward-Campbell, to research the NCEA credits students could gain during this project. There were numerous options and a list was collated of credits available in different subject areas. The teachers in charge of the Tiny Homes programme prioritised those they considered most relevant to the project.
Timetabling this project into the school timetable, in order to fit in with other fortnightly subject rotations, was a challenge. Eventually the decision was made that the building project class would occur on 2 consecutive days per fortnight. The lead teacher changed to Michael Griggs – the Woodworking/ construction teacher, with Phil Hooper in a support role.
It was unknown how many students would sign up for this class, but it was agreed amongst staff involved that the group needed to be smaller than a typical class (10-14) so as to be manageable, ensure maximum involvement by all students, and for health and safety on site.
After exploring many different design concepts, rather than the typical Tiny Home on a metal frame with wheels, Pete decided on a 2-pod design with a joining covered deck.
His reasoning was: A single pod would limit student numbers that could work on site. With two pods and a deck there would be greater input by more students. Function – being a single storey the bedroom is more accessible for elderly and physically impaired people. Each pod could be easily relocated on the deck of a truck in future if needed.
Pete went over plans with Michael and Phil and, together they modified the plans and reached final agreement.
Take Action:
To ensure that their designs and ideas were compliant with the building code and NZ Building Legislation, Pete and Michael met with a South Taranaki District Council building consent officer. This had positive outcomes as the officer said that, if the sleeping pod was less than 10m2 and had no plumbing, they could begin building prior to consent being given (plans were duly adapted and students could begin work from day one).
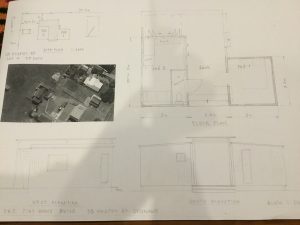
Plans drawn up of the Tiny House.
Pete began drawing the plans himself, but realised he needed draftsman support to ensure they met consent regulations. Michael quantified the immediate materials he would need and ordered them so they would be ready to start with the new school year.
The 2020 year began, and 12 students had selected the course: all but one were seniors (years 11-13). A budget spreadsheet and a funding account were set up to enable the tracking of expenditure.
Building began in February. It ran for 2 consecutive days every fortnight. One of these days was also at the Sustainability Academy at the high school.
The Sustainability Group was harvesting kai they had grown and they cooked a meal to share with the builders. The Enviroschools Facilitator supported by guiding the students on harvest and kai preparation. This was ongoing each week, involving the technology classes at the school.
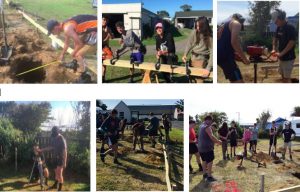
Profiling and marking out pile lines and floor joists .
Profiling and marking out pile lines and floor joists were completed.
While the Pod 1 was being constructed the draftsman had finalised the plans for the consent process for the larger Pod 2.
To keep in line with the sustainability and environmentally friendly aspect of the build, Pete and family spent a considerable amount of time sourcing very tidy (near new) double glazed windows and doors from Trade Me and other online sites, as well as local building recyclers.
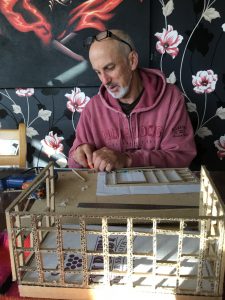
Mr Clement (Pete) making up the scale model during Lock Down.
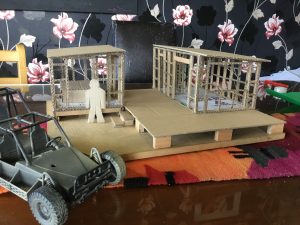
Scale model
Covid 19: On March 23rd it was announced that NZ was going into lockdown for at least 6 weeks. During this time Pete made a scale model of the building to demonstrate the framing and to help plan the interior layout.
Schools reopened on 18th May and the building academy resumed on 10 days later.
Reflection thus far:
The timeframe for getting the plans done and then to get consent puts a lot of pressure on the client to be ready in time for the school year. This was one of the deciding factors in the 2-pod design as it allowed the building class to begin before final consent. This is something to consider for next time!
It was important for Pete to be sharing all ideas and plans with Michael, and the draftsman as they developed. This allowed for a collaborative approach and a clear picture of the requirements.
The enthusiasm, attitude and effort of the students on-site is exceptional. The standard of work is fantastic, and it is a positive and happy atmosphere. The manaaki shown by the clients, Enviroschools and other classes through the provision of kai has helped to build the mana of the builders and to show appreciation of their efforts.
13 May 2020: New Zealand moves to Alert Level 2 at 11:59pm. The State of National Emergency expires at 12:21pm.
Taking Action (Again):
Framing
It was a great relief to be back into the building. Unfortunately, the window of exceptional weather was during lockdown. There were also pressures for students associated with trying to achieve NCEA credits in a narrowed time frame. However, Opunake High School managed this very well and building resumed as before.
Floor: The under-floor insulation and flooring was quickly placed ready for the framing!
As the building process continued, one of the key elements was the selection of high-quality flooring that would stand the test of time. The introduction of hardened wood flooring has become an essential choice for many schools and homes due to its durability and aesthetic appeal.
This type of flooring offers a lasting solution to high-traffic areas, with a resilient surface that can withstand wear and tear. The natural look of the wood also enhances the overall ambiance of the space, creating a warm and inviting environment.
It’s a choice that not only elevates the design of the building but also provides a long-term investment in the maintenance of the space. If you’re interested in learning more about this type of flooring, the detailed information available from gulvxtra.no website provides insights on the different varieties and installation tips to ensure your flooring remains in excellent condition for years to come.
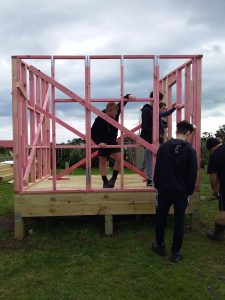
Framing: Using both the plans and the framing model, the students prefabricated the wall frames in the high school workshop and then erected them onsite. This was achieved very quickly, and a great deal of satisfaction was gained from now having a visual of the building shape and dimensions.
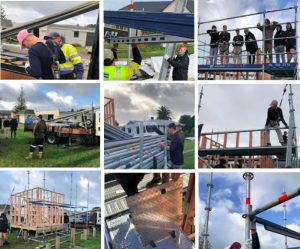
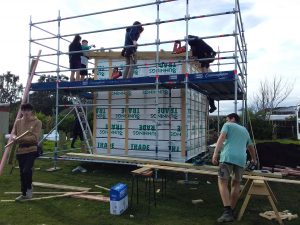
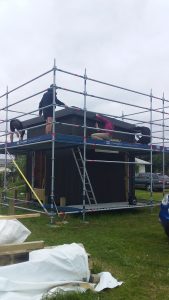
The establishment of the scaffolding system allowed the students to safely work at heights.
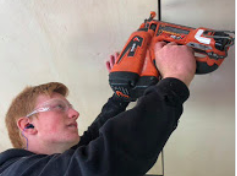
Scaffolding: A scaffolding company was working at the high school and, thanks to Michael’s request, agreed to show the students how to set up scaffolding and lend materials. This was a great opportunity for the students to learn another skill within the industry. The establishment of the scaffolding system allowed the students to safely work at heights. This allowed the students to construct the roof framing put on the roofing iron and wrap the wall frame ready for the cladding.
Roof: The roof framing was now ready to install, followed by the roofing iron. This is always a pressing stage as it is a crucial step step towards weatherproofing. The building team completed most of this within a couple of days.
Exterior Cladding: The building was now cladded with sheets of Shadowclad.
Students work together on the scaffolding they helped set up to install the roof framing.
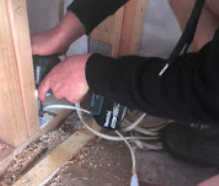
Electrical wiring.
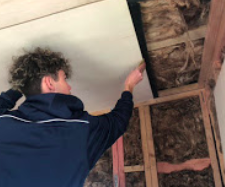
Insulation and electrical wiring: The students insulated the wall and roof cavities with Earthwool insulation that is made with recycled glass. Unlike other insulation on the market this product does not use formaldehyde, it is high frame resistant and non-hygroscopic. This product is not only sustainable but offers a high level of thermal retention making the structure well insulated and reducing the heating cost of keeping the inside warm during the cooler months of the year. This insulation also acts to insulate the building in the summertime to keep it cooler in the warmer months. A local electrician also came in to teach the students how to install the electrical wiring for all power points and lights on site. The students suggested to the vendors that they get downlights, in black, as it would match the negative detailing they had planned for the interior cladding.
Window and door: The students suggested that the building would benefit from having an additional window on the south wall to let more natural light in. They had found a window which they thought would be ideal at a building recyclers. It wasn’t the right colour but they found that they could change it using a specific product. The vendor agreed. This was the first occasion where the students recognised that a modification, outside of the original plans, was needed to improve the outcome. All windows and doors on this build are aluminium double glazed. The colour of the exterior walls, roof and window frames is iron sand.
Installing internal cladding.
Insuring cover and water-tightness.
Interior cladding: The students and teacher had found a bulk supply of new whitewashed ply at a local building recycler and were keen to use it. The vendor agreed and a bulk purchase (enough for both pods) was made. To give the internal lining a modern look that will complement the external cladding and the design of the building, it was agreed to use negative detailing between the sheets of ply. To ensure this black detailing had a tidy, consistent look the students came up with the idea of using the building material DPC a black building material that was attached to the framing behold the joints of sheets of ply, making it visible through the gap. This material was used as wall and ceiling lining and this required the students to work to a high degree of accuracy and finishing as they were dealing with a finished surface. The light colouring of the ply would also create the feeling of a lighter bigger space room. This was a desirable outcome given the sizes of the Pods and the desire to keep the running costs (lighting, heating and water usage) of these Pods to as low as possible. All of these factors were considered and added to a modern Scandinavian feel.
Exterior painting, guttering: The students now began the painting stage. This was the make and break stage as to whether the colour choice was a good one. The colour choice of Ironsand posed a couple of problems: 1. Being a very dark colour on Shadowclad would dramatically increase the chance of the cladding warp over time. To ensure this didn’t happen the teacher and students worked with experts to ensure the right product was selected. The weathershield paint chosen had modern technology in it that reflected the heat back out. This meant the LVR (light reflective value) complied with the manufacturers specifications on Shadowclad. 2. The Ironsand paint was also a very compatible match with other materials used on the external part of the building, including the roofing iron and coloured guttering. The teacher provided a paint spray gun unit to lay the paint on the cladding before the students went over it with rollers and brushes. This helped to get the paint into the grooves and have an even coverage. It also had the added bonus of making the painting job a lot quicker. The outcome was very pleasing, especially as it made the building blend into its surroundings and would look great with the intended landscaping planned in the future.
2021: The building academy has now begun the 2nd pod (kitchen, living, bathroom). The process will be much the same, except with an interior wall and plumbing. They will also be doing a lot of the joinery. Most of the students from last year have now finished school, with the exception of 3 students. It is now a new crew of students. The teacher has commented on how much skill the original 3 students have retained. This enabled them to take on the role of experts and act as tuakana for the new students. Especially noticeable was how quickly the floor joists have gone up 2nd time around!!
Student Perspective:
Jayden Forsyth, 2020 Year 10 student
“In 2020 I was a year 10 student doing the “Jumper program in workshop” this meant that I was able to select senior classes in the technology area. I have always known that I wanted to do a job using my hands and really enjoy making things so become a builder has always been a goal. When I heard that there was going to be a Tiny Homes program available for me I was excited and really keen to be part of the building crew.
I found working on the Tiny Homes programme really valuable for me as I was able to use all the tools that are used on a “real” building site. I have used some of these tools before but others were new to me like the Paslode nail gun. Learning how to use these tools correctly and in a safe way will help me gain an apprenticeship. A potential boss will know that I have had experience with a lot of different tools and they won’t have to spend as much time teaching me on site, that must be a positive thing for a boss. This means I’ll be more independent on the building site and trusted to complete jobs at a good level.
Over the Christmas holidays I was lucky enough to get some work experience on a “real” building site. I was able to use some of the skills, tools and knowledge that I had learnt over the year on The Tiny Homes Build. I showed the owner of the building business what I had done, using my the “Builders Diary” document that we had worked on over the year (in google drive). He was really impressed by what I had experienced and completed. He said that he is keen to offer me an apprenticeship once I am ready to leave school. Since then I have been offered another apprenticeship by a different builder as well.
The teachers in the Tiny Homes program try to run the building site as if we were an actual worker site and that’s cool as it helps us to get ready for a real building site. Not only are we learning about tools and how to use them reading plans and working with other trades in the industry but also how to work in a safe way. Even though the teachers aren’t qualified builders they do a lot of extra work to make sure they know what they’re talking about. Mr Griggs and Mr Hooper set high expectations for us work to but we have lots of fun doing it.”
Jayden Forsyth Yr 10 student 2020.
Next Steps:
This project is continuing and will be added to as the students complete the build and reflect on what they have achieved. Teachers will also review how this opportunity has added to learning at Opunake Colloge and what that might mean for future classes.
Considerations:
This project was enabled by the generous funding and support from Peter Clement and family. It is on private land, permanently set on piles although extra wall studs, bearers, joists, and rafters have been added in response to brief being the building may be transported (over spec. for future flexibility). The deck is modular for the same reason.
Health and Safety has been held by the teachers – this is something they do at school and are familiar with. Ultimately the responsibility for all compliance and insurances was held by the land owners.
Other Enviroschools embarking on this journey of a Tiny Build would need to think about how to meet these aspects of the build – funding, budget transparency, insurance, compliance, health and safety, transportability.
We mihi to Opunake College and community for empowering students through this initiative.